jquery

我们将在这个demo中制作一个标题组件,它将拥有改变尺寸、字体、字体颜色的、排量方式的属性栏,还拥有数据源组件的属性。

在我们选择完数据源,以及维度或度量后,文本中左侧将展示度量或维度的名称,右侧将展示对应的值。

示例中我们将展示如何引入jquery,以及通过jquey改变html上的显示值。

创建组件

Application

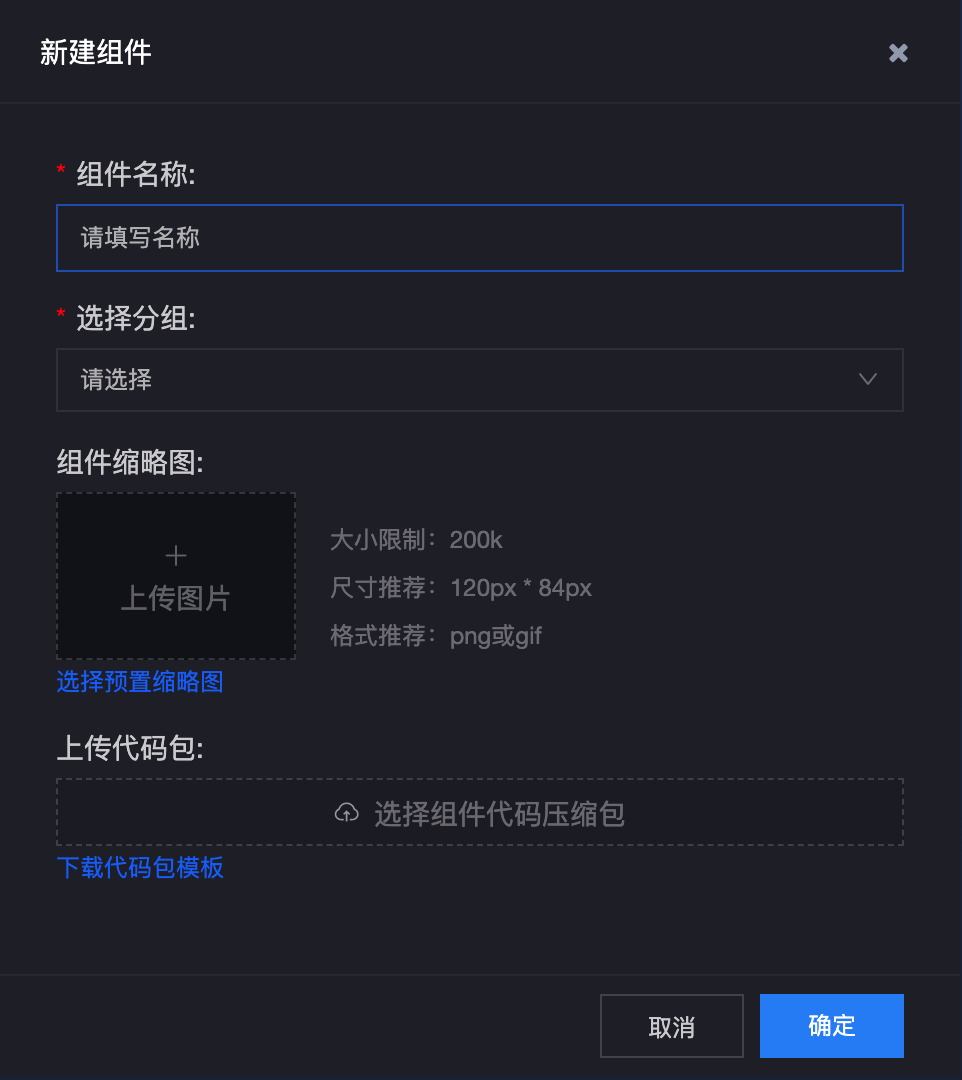
在这里填写好组件名称,选好分组后可以直接点击确定。系统会自动创建好一些必须的初始化文件。

html

修改原有html

<body>
<div id="_#visroot#_" class="_#customWidget#_">
<div class="text-title">
</div>
<div class="text-value">
</div>
</div>
</body>

config.json

需要在plugins中配置jquery。

{
"develop":{
"html":"index.html",
"css":[],
"entry":"main.js",
"scripts":{
}
},
"plugins":["jquery"],
"libs":[],
"services":[],
"customAttributes":{
"pro":[],
"con":[]
}
}

我们需要在config中配置属性栏组件

{
"develop":{
"html":"index.html",
"css":[],
"entry":"main.js",
"scripts":{
}
},
"plugins":["jquery"],
"libs":[],
"services":[],
"customAttributes":{
"pro":[
{
"type":"BgSize",
"name":"尺寸"
},
{
"type":"WidgetSelect",
"name":"字体",
"customInput":{
"ngvSelects":[
{ "lable": "PingFangSC-Regular", "value": "PingFangSC-Regular" }, { "lable": "Fantasy", "value": "Fantasy" }, { "lable": "Microsoft YaHei", "value": "Microsoft YaHei" },
{ "lable": "Arial", "value": "Arial" }, { "lable": "Helvetica", "value": "Helvetica" }, { "lable": "sans-serif", "value": "sans-serif" },
{ "lable": "Arial Black", "value": "Arial Black" }, { "lable": "Georgia", "value": "Georgia" }, { "lable": "Verdana", "value": "Verdana" },
{ "lable": "serif", "value": "serif" }, { "lable": "Monaco", "value": "Monaco" }, { "lable": "SimSun", "value": "SimSun" },
{ "lable": "Cursive", "value": "Cursive" }, { "lable": "workFont", "value": "workFont" }, { "lable": "digitalFont ", "value": "digitalFont" }, { "lable": "BebasNeueRegular ", "value": "BebasNeueRegular" }, { "lable": "Helvetica ", "value": "Helvetica" }
],
"ngvModel":"PingFangSC-Regular",
"labelName":"lable",
"valueName":"value",
"ngvHeight":"100px"
},
"callback":{
"ngvModel":"selectChanged"
}
},
{
"type":"GradientColor",
"name":"key值颜色",
"customInput":{
"shade":true,
"ngvModel":"#fff"
},
"callback":{
"ngvModel":"keyColorChange"
}
},
{
"type":"GradientColor",
"name":"value值颜色",
"customInput":{
"shade":true,
"ngvModel":"#fff"
},
"callback":{
"ngvModel":"valueColorChange"
}
},
{
"type":"WidgetSelect",
"name":"排列方向",
"customInput":{
"ngvSelects":[
{ "lable": "横向", "value": "horizontal" },
{ "lable": "纵向", "value": "vertical" },
],
"ngvModel":"horizontal",
"labelName":"lable",
"valueName":"value",
"ngvHeight":"100px"
},
"callback":{
"ngvModel":"selectChanged"
}
}
],
"con":[]
}
}

Application

我们配置了一个尺寸组件,一个字体下拉列表,两个颜色组件,一个排列列表。

字体组件中的ngvSelects列表是云视界内部拥有的值。

除了尺寸组件我们没有配置callback函数,因为我们不需要对组件尺寸做相应调整。其他组件都需要设置回调函数。

需要在main.js中的return对象中创建这些回调函数。

main.js:

(function(options){
var sub=options['sub']();
return {
$data:{
properties:null
},
$hooks:{
onInit(properties){
this.properties=properties;
},
onDestroy(){
console.log('销毁')
},
setData(value){
}
},
$methods:{
fontSelcted(font){
console.log(font);
},
keyColorChange(color){
console.log(color);
},
valueColorChange(color){
console.log(color);
},
arrangementChanged(type){
console.log(type);
}
}
}
})

接下来需要在config.json中配置数据源组件

{
"develop":{
"html":"index.html",
"css":["./index.css"],
"entry":"main.js",
"scripts":{
}
},
"plugins":["jquery"],
"libs":[],
"services":[],
"customAttributes":{
"pro":[
{
"type":"BgSize",
"name":"尺寸"
},
{
"type":"SlideInputBarComponent",
"name":"字体大小",
"customInput":{
"nzMin":12,
"nzMax":100,
"nzStep":1,
"ngvModel":14,
"hideProgress":false
},
"callback":{"ngvModel":"fontSizeSelcted"}
},
{
"type":"GradientColor",
"name":"键颜色",
"customInput":{
"shade":true,
"ngvModel":"#fff"
},
"callback":{
"ngvModel":"keyColorChange"
}
},
{
"type":"GradientColor",
"name":"值颜色",
"customInput":{
"shade":true,
"ngvModel":"#fff"
},
"callback":{
"ngvModel":"valueColorChange"
}
},
{
"type":"WidgetSelect",
"name":"排列方向",
"customInput":{
"ngvSelects":[
{ "lable": "横向", "value": "horizontal" },
{ "lable": "纵向", "value": "vertical" }
],
"ngvModel":"horizontal",
"labelName":"lable",
"valueName":"value",
"ngvHeight":"100px"
},
"callback":{
"ngvModel":"arrangementChanged"
}
}
],
"con":[
{
"type":"BiDatasourceConfigComponent",
"customInput":{
"dimensionCount":1,
"justDimension":true
}
},{
"type":"ShadowTitleDisplay",
"name":"参与组件过滤"
}
]
}
}

上例中在 customAttributes.con中配置了数据源组件,和参与组件过滤。

我们只取维度的数据,所以设置justDimension为true,本例中我们只需要一个维度,所以配置了dimensionCount为1。

参与组件过滤,我们配置数据源组件的时候默认带上它,它的作用是其他筛选器可以对当前组件连接的数据源进行筛选。

至此我们完成了组件的配置,下面需要在main.js中完成开发。

先处理setData方法,当我们连接完数据源后,当云视界拿到数据的时候会调用这个方法。

setData方法的入参值value中,包含了一些复合信息。除了返回的数据外,还报错,连接的数据源信息,其中又包括维度和度量的信息。我们可以处理成自己想要的数据。

这里我们以后会封装一些api,让开发者可以快速的调用对应的方法,得到想要的数据。但目前位置,需要开发者自己处理。

连接好数据源和维度后,setData方法得到数据。打印后得到以下数据:

某个只选择了维度的数据源信息:

{"data":{"type":"unlive","data":{"c0":["张三","李四","王五","赵六","张三","李四","王五","赵六"]},"empty":false},"dataSourceInfo":{"data":{"model_id":null,"datasourceInfo":{"dsUuid":"156422544490600006","table":"t_156422543330000006","name":"数据源xy","mode":"","format":"xlsx","type":"file"},"group":false,"filter":[],"requestParams":[],"measure":[],"dimension":[{"column":{"column":"c0","type":"string","name":"姓名"}}],"screen":true,"newFiels":[],"linkageFiels":[],"dataType":"datasource","isUseNewDatasource":true},"type":"dimension"}}

data.type,unlive表明当前是非实时数据

data.data中的c0,就是我们选择的维度返回的数据,如果选择多个维度,data.data中会有多个值。

data.dataSourceInfo.measure中存储的是度量信息。

data.dataSourceInfo.dimension中存储的是维度信息。

css:

._#customWidget#_{
display:flex;
}
._#customWidget#_ .text-title{
flex:1;
text-align:center;
line-height:100%;
}
._#customWidget#_ .text-value{
flex:1;
text-align:center;
}

下面是全部的main.js代码。

(function(options){
var $=window.plugins.jquery;
return {
$data:{
properties:null,
arrangement:null,
width:null,
height:null,
data:null,
interval:null,
index:0
},
$hooks:{
onInit(properties){
this.properties=properties;
this.arrangement=this.properties.config.customAttributes.pro[4].customInput.ngvModel;
this.width=this.properties.style.width;
this.height=this.properties.style.height;
},
onDestroy(){
console.log('销毁')
if(this.interval){
//当组件销毁的时候,将setInterva清除掉。
clearInterval(this.interval);
}
},
setData(value){
let dimensionKey=this.getDimensionKey(value); //提取维度字段
let dimensionName=this.getDimensionName(value);//提取维度名称
let data=this.getDimensionData(value,dimensionKey);
$("#_#visroot#_ .text-title").html(dimensionName);
$("#_#visroot#_ .text-value").html(data[0]);//展示数据中的第一个值
if(data)this.data=data;
if(!this.interval&&this.data&&this.data.length>0){
this.interval=setInterval(()=>{
this.index++;
if(this.index>this.data.length-1)this.index=0;
//循环显示返回的值。
$("#_#visroot#_ .text-value").html(this.data[this.index]);
},3000)
}
},
outSizeCallBack(value){
this.arrangementChanged(this.arrangement);
}
},
$methods:{
progressCallback(value){
console.log(value);
//10,50
},
fontSizeSelcted(font){
console.log(font);
if(font){
$("#_#visroot#_ .text-title").css('font-size',font+'px');
$("#_#visroot#_ .text-value").css('font-size',font+'px');
}
},
keyColorChange(color){
if(color){
$("#_#visroot#_ .text-title").css('color',color);
}
},
valueColorChange(color){
if(color){
$("#_#visroot#_ .text-value").css('color',color);
}
},
arrangementChanged(type){
console.log(type);
if(type){
this.arrangement=type;
if(type==='horizontal'){
$("#_#visroot#_").css("flex-direction","row");
}else{
$("#_#visroot#_").css("flex-direction","column");
}
}
if(this.arrangement){
if(this.arrangement==='horizontal'){
$("#_#visroot#_ .text-title").css("line-height",this.height);
$("#_#visroot#_ .text-value").css("line-height",this.height);
}else{
$("#_#visroot#_ .text-title").css("line-height",parseFloat(this.height)/2+'px');
$("#_#visroot#_ .text-value").css("line-height",parseFloat(this.height)/2+'px');
}
}
},
getDimensionData(data,dimensionKey){
return data.data.data[dimensionKey]
},
getDimensionKey(data){
return data.dataSourceInfo.data.dimension[0].column.column;
},
getDimensionName(data){
return data.dataSourceInfo.data.dimension[0].column.name;
}
}
}
})

在函数头部,就声明了变量$,用来接收jquery插件的引用。

var $=window.plugins.jquery;

云视界提供的内部插件,都放在window.plugins下。

通过window.plugins['插件名称']引用,这个插件名称,以开发文档中提到的为准。

还需要注意,如果想引用插件,必须在config.json中的plugins中引入,否则window.plugins中将无法引用该插件。

属性栏组件的回调函数中都对入参值做了非空判断,这是有必要的,初始化的时候这些回调函数会被调用,但入参值有可能是undefined。

$data属性中,声明了一些变量,然后在onInit方法中对变量进行赋值。

onInit方法中通过在properties中获取组件的宽度、高度、还有排列方式。

setData方法中对返回的数据做了处理。最终创建一个setInterval方法,让返回值循环显示。

onDestroy方法中再把这个interval清除掉。